 | |||
 |
 |  | |
 |  | ||
 |  | ||
 |  | ||
 |  | ||

| Please Read: How to Help Our Site at No Cost to You - Some of our articles contain recommendations for products we like and vendors we personally trust. Some of those vendors may pay us a very small commission if you click on a link and buy their products. This costs you nothing at all and helps offset the costs of what we do. So if we point you to something you decide to buy later, please make certain you come back through our site and click on the link directly. Thanks. |
| This Site is a Cookie-Free Zone - Except for discussion forums that you have to expressly registor for, none of our pages use cookies of any kind. Some of the vendors we link to do, but that won't affect you unless you click on a link to their pages. Your continued use of this page indicates that you agree to our policy. For details, click here. |


|
Making a Ghost TrainSo, in the late summer of 2021, I discovered that our garden railroad club was going to have open railroads in October. So what could be more natural than having a Halloween-themed railroad?I already have Hogwarts trains and a castle that I set up for the kiddies as part of our Christmas-themed open railroads each November. But what would make my railroad seem even more "Halloweeny"? I considered building or buying a haunted house, but then I thought about making a ghost train, using bits and pieces of old Bachmann sets that are "out of service" for one reason or another. What would I call it? "Spook Hill Express," of course. Spook Hill is the name of a friend's fictitious Halloween town, built of cardboard, after the fashion of the old Japanese Cardboard Christmas houses. If you click on the photo, you'll find Howard Lamey's step-by-step instructions for building a number of great Halloween-themed structures. But there's more to it than that. In 2012, inspired by Howard's designs, I wrote a family-friendly Halloween-themed novel called The Spook Hill Chronicles.
Each chapter is illustrated with photos of Howard's projects. Looking for Donor TrainsAs of October, 2021, Bachmann's Large Scale passenger trains have been discontinued for about four years (although it took a while for them to clear the shelves). But over the years, through trades and train shows, I've accumulated a few sets, including some I never actually ran because they came in the "grab bag" with something I actually wanted.One of those sets was an early "Royal Blue" passenger set that came to me with the locomotive missing several parts.
I wanted to repaint the train purple with orange highlights, so the orange clerestory windows were just fine with me. At the time I wasn't thinking seriously about lighting, so I made a mistake I won't make again (see below). Disassembly - The first step was disassembling the coaches. There are a mess of screws and four "snaps" on the bottom of the car. A few of the screws actually hold the seats to the floor, so they don't all have to come out, but if they do, it's no big deal. That said, on some early passenger car sets, the lighting circuit is wired differently, so you have to unscrew all the screws and pull the floor of the car away from the seats temporarily until you loosen two other screws. Side Windows - The windows in the sides of the cars are lightly glued, but they also sort of snap in. At the top, they sit in a slot, unglued, but at the bottom, they snap over molded-in posts that receive the screws from the floor assembly. They can be snapped out gently by working the bottom edge with a knife blade or slim screwdriver until the glue gives loose. The part around the post may deteriorate, but you're going to glue them back into place anyway. I left the celestory windows alone - see below. Prep for Repaint - I was going repaint and to apply new lettering (via a Cricut, see below). But just painting over the old lettering wouldn't be enough. If it is left on, you can still see the outlines through the spray paint. I tried several chemicals to try to get it off, but none of them worked. I didn't have any brake fluid - my old go-to - handy, or I would have tried it. I guess that's the downside of having automobiles that aren't 20 years old.
The sandpaper didn't get down into the cracks between the "boards" as well as I'd like, but it cleaned things up enough that wasn't worried about the old lettering making discernable bulges under the spray paint. The trucks were dark blue, but I left them, since you hardly them anyway. The bits between and around the celestory windows were also dark blue. If I was repainting the cars for a serious modeling effort I could have masked off the celestory windows and painted that part. Or I could have disassembled the lighting features and pulled out the celestory windows. But I didn't think I could do that without breaking the lighting features. So I determined to leave lhat part "as-is" and just mask the entire roof section when I painted. As it turns out you don't really notice that the bits between the celestory roof are dark blue - they look black in most light, which is just fine. What I DIDN'T think about was masking the lighting stuff. Even though I hadn't planned to use it, I should have masked it off in case I wanted to get it working later.
So I masked off the entire roof section, including the celestory window sections and the stove pipe. Then I primed the walls of the cars with gray primer, using several light coats to avoid drips, etc. When the primer looked even all around, I painted the car walls with the purple topcoat, again, being careful to avoid drips or places where the paint went on too thick.
Unfortunately, as mentioned before, I didn't think about masking off the lighting features in the top of the cars. So there was enough overspray for them all to become purple, including the little lightbulbs. If I ever want to light the cars, it will take at least replacing the light bulbs. Passengers - Of course a "ghost train" should include ghosts. When I started this project, I ordered some of those cheap Asian 1:24 plastic figures to paint and glue in place. I got the unpainted version, which is cheaper, and better for this project anyway. (BTW, if you're ever tempted to order a set like this, painted or not, try to get the set with six different molds. Otherwise approximately 1 out of four will be waving her arm like Hermione Granger in Snape's classroom. Quite a few Large Scalers have cut her arm off and positioned her where it wouldn't be noticed. Don't tell their grandchildren.) When they arrived, they were a sort of cream color. So I used up the rest of a can of flat white paint on them. Then I sprayed them with "glow-in-the-dark" spray paint. They don't sit properly on the seats unless their feet are cut off. Yes it seems like a rather procrustean situation, but as Grishn??k says, they don't need those. Especially since they're ghosts. Sorry, too many Halloweeny ideas floating around in my head.
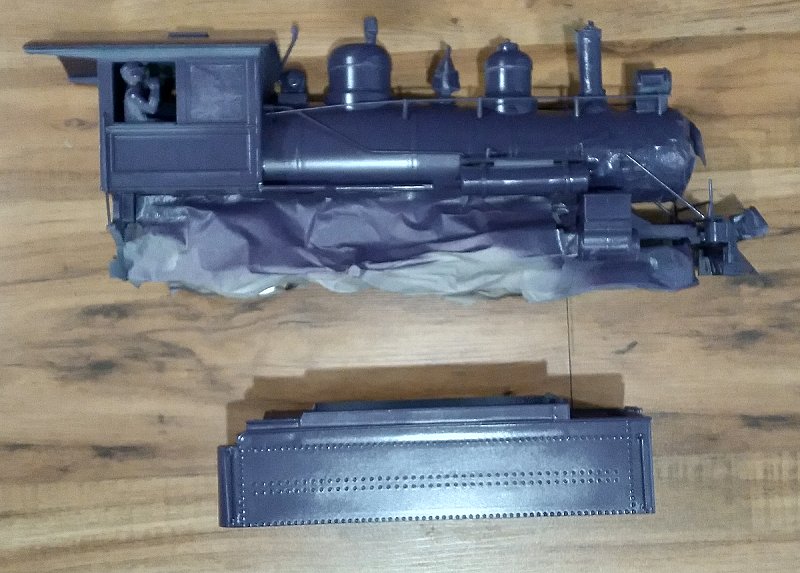
Car Reassembly - I glued the windows back in place and let them set. (You drop them into the slots at the edge of the roof, snap them over the rods, and add a dab of glue.) Then I screwed everything back together. Tender Painting - The tender was easy, because the shell unscrews, and the coal load unscrews from the shell. I only had to mask a little bit of "coal" on the front platform. One of the trucks on the tender was broken, but I used a truck from a Bachmann freight car that was already missing other pieces - they're the same except for the old tender truck being dark blue. Locomotive Issues - But the old B&O locomotive I wanted to restore and use for this project was too far gone to get working again. So it's now in a "parts bin." Running out of time, I used another locomotive that needed less work and which had already been separated from its tender. I masked off the pilot, the smokestack, the smokebox, the windows, the bell, and everything underneath the running boards. Then I primed and painted it, along with the tender shell.
In retrospect, I should have masked off the engineer as well, but if I want to, I can paint his face and hand white and pretend his uniform is purple. Lettering - inspired by several hobbyist friends who use their Cricuts to make signs and reletter their cars, I thought I would give that a try. I had a single sheet of bright red-orange left over from a bundle I bought years ago when I acquired my first Cricut. I have no idea what the name of that color would be. Using Corel Draw, I created .svg files to load into Cricut's Design Space and cut on my Explore with a fine-tipped blade. I have that software because I used to have to do a lot of graphics for my "day job." But you could use InkSpace (a free vector-graphic program) to do the same thing. Or Adobe Illustrator if you have that. I tried using the Railroad Roman font developed by Benn Coifman to represent mid-to-late-1800s railroad lettering (left below), but the little skinny lines were so skinny, the Cricut cut them as a single cut, so the lettering was useless.
Next I tried Monotype Plantin (Bold), which I bought directly from Monotype in the 1980s because it was the official typeface of my employer. When stretched out a little, it's proportions are very like the serif typeface PRR used when they weren't using Futura (gag!). It's also similar to the typeface used on the Warner Brothers' version of the Polar Express. When it's 24 points high, it's about the right size for the signboards on the coaches. I tried using Cricut's Plantin Schoolbook (from a font cartridge I own and have linked to my account in Design Space). But I couldn't stretch it the way I wanted. While in Corel Draw, I converted the letters to curves, then saved the file as a .svg file (which Design Space can read, finally.) When I forgot to convert the text to curves, Design Space tried to cut all the Ss, then all the Ps, then all the Os, and so on. Which would have been a nightmare to try to align on the train. That said, such mishaps gave me a chance to get the blade to the right depth on the Cricut.
Ironically, after I got my train lettered, one of the fellows whose projects encouraged me to take this approach said something like "Looks great. Weeding sure is a lot of trouble, isn't it?" Still, the results are nice. (If you own a craftcutter and you want to take a look at my source file, click here. 
2003 and 2013 are the years my railroad has been included in the NGRC tour. We've moved since, but you if you click on the photo above, you might recognize some of the buildings. ConclusionThe train has now run for two open RRs and has entertained other visitors. I bought some orange pinstriping tape for the running boards and a few other places, but have yet to use it, as other projects have come up.In the meantime, in preparing for Halloween-themed open RRs, I also filled four HLW hoppers with putka pods - a potpurri ingredient that looks like tiny pumpkins. 
If you click on the photo to the right, then click on it again, you should be able to see a Lego Knight Bus, as well as Harry, Ron, and Hermione on broomsticks fleeing a dragon. Above that is the Spook Hill Express, above that, a lonely little LGB Porter just doing its job. But you won't hear the extensive Halloween soundtrack that also greets visitors, with several creepy, but family-friendly tunes. Since I took the photo, I came across three more cars I may paint purple next year: two unlabeled Bachmann gondolas (to take over the putka/pumpking hauling chores) and one very old and battered Santa Fe caboose I couldn't even give away at the last club meeting. As of this writing, though, further Halloween plans are curtailed. Our November Christmas-themed open RR is looming, and that takes a lot of pre-work. I don't need to paint any trains for Christmas, since so many were made, but they're getting "long in the tooth" and need some TLC to be ready. If you're going to be anywhere near Springfield Ohio on Nov. 12, 2021, let me know, and I'll send you details. Keep in TouchIf you're headed toward or past Springfield, Ohio, please let me know, and I'll see if we can work out a quick visit. Finally, please let us know about your ongoing projects. Ask questions, send corrections, suggest article ideas, send photos, whatever you think will help you or your fellow railroaders. In the meantime, enjoy your trains, and especially enjoy any time you have with your family in the coming weeks, Paul Race Return to Family Garden Trains' Home Page - The home page with links to all the other stuff, including design guidelines, construction techniques, structure tips, free graphics, and more.
Click on the photo to see our status as of early November, 2021.
Click on the picture to see our status as of early October, 2021.
Click on the photo to see our status as of mid-August, 2021.
Click on the photo to see our status as of late July, 2021.
Click on the picture to see our status as of mid-July, 2021.
Click on the picture to see our status as of late March, 2021.
Click on the picture to see our status as of January, 2021.
Click on the picture to see our status as of late December, 2020.
Click on the picture to see our status as of early December, 2020.
The next "permanent" improvements will wait for now. In the meantime, we will set out buildings and a temporary loop or to entertain visitors between now and Christmas. Click on the picture to see our status as of mid-November, 2020.
We also added one last tweak to the frame design to make it easier to extend this platform to its originally planned size, if and when we get a chance to do so.
We were hoping to get the lumber we need to finish the platform before cold weather set in. Click on the link to see our status as of late September, 2020.
Click on the following link to see our status as of late January, 2020. https://familygardentrains.com/newbost/20_1_19_shelves/shelves.htm
Click on the photo to see the options we were reviewing for the next and last expansion.
Click on the following link to see our status as of early December, 2019. https://familygardentrains.com/newbost/19_11_24_winter_prep/19_11_24_winter_prep.htm
Click on the photo to see a brief record of our busiest weekend in November, 2019.
Click on the following link to see our progress of mid-November, 2019.
Click on the photo to see our status as of late October, 2019.
Click on the following link to see our progress of early October, 2019.
Click on the photo to see our plans for the next addition, as of late September, 2019.
The process included checking the pump, extending the hoses, rescuing toads, building the platform, trimming the platform, testing the pool's location, etc. Click the photo to go to the article.
Click on the photo to see our progress as of mid-September, 2019.
Click on the photo to see a lot of last-minute preparations and some photos of the November 10, 2018 event itself.
By the way, going over lumber receipts in early 2019, I couldn't believe I was still siding the train shed in late October, and managed to have an open railroad in mid-November. It is a little crazy how fast things can go together if you have a deadline and a lot of gift cards. Click on the photo to see our progress as of late October, 2018.
Includes choosing the siding and windows, installing the door, painting the windowframes, and adding crosspieces to support the vertical siding boards.
Now the roof is waterproof enough to get us through the next couple of months at least, maybe more.
I thought about bringing in helpers for this part, but a reader commented on how helpful it was to see how one person could do this sort of thing by himself, so I just kept plugging away. Click on the photo to see our progress as of September 13, 2018
Click on the photo to see our status as of August 5, 2018.
The way we got the rafters and ridge board up wouldn't work for everybody, but it worked for us, and hopefully will help other folks to "think outside the box" - literally in this case. Click on the photo to see our progress as of July 14, 2018.
Click on the photo to see our status as of July 9, 2018.
Click on the photo to see our progress as of June 13, 2018.
Click on the photo to see our status as of June 1, 2018.
Click on the photo to see our status as of February 20, 2018
Click on the photo to see our status as of February 20, 2018
Click on the photo to see our status as of November 21, 2017
Click on the photo to see our status as of October 25, 2017
Click on the photo to see our status as of October 15, 2017
Click on the photo to see our status as of October, 10, 2017
Click on the photo to see our status as of September 26, 2017
Click on the photo to see our status as of September 17, 2017
Click on the photo to see our status as of September 7, 2017
Click on the photo to see our status as of August 10, 2017
Click on the photo to see our status as of the end of July, 2017
Click on the photo to see what we were considering as of late May, 2017
Click on the photo to see what we were considering as of late April, 2017
Click on the photo to see what we were considering in early April, 2017
Click on the photo to see what we were considering in March, 2017
Click on the photo to see the home page of Paul's railroad.
To read more, or to look at recommended Garden Railroading and Big Indoor Train products, please click on the index pages below.
|
 
|


 Proceed to "Preparing for 2021's Christmas Train Day."
 Return to "Portal Installation on the New Boston and Donnels Creek."
  Return to "Dirtscaping on the New Boston and Donnels Creek, Part 3"
 Return to "Tunnel Framing on the New Boston and Donnels Creek, Part 2"
 Return to "Tunnel Framing on the New Boston and Donnels Creek, Part 1."
  Return to "New Right-of-Ways on the New Boston and Donnels Creek RR"
 Return to "Creating a Railroad Timetable"
 Return to "Christmas Preparations and Operations 2020"
 Return to "Garage to Train Station, Part 2"
 Return to "Garage to Train Station, Part 1"
 Return to "Westward Expansion, 2020, Part 3"
 Return to "Westward Expansion, 2020, Part 2"
 Return to "Westward Expansion, 2020, Part 1"
 Return to "Train Storage Solutions, 2020"
 Return to "Expansion Planning, 2020"
 Return to "Winter Preparation, 2019"
 Return to "Christmas Train Day, 2019"
 Return to "Preparing for Christmas Train Day 2019"
 Return to Decking the NEW New Boston and Donnels Creek Part 2
 Return to "Framing the NEW New Boston and Donnels Creek RR - Part 7"
 Return to "Planning the NEW New Boston and Donnels Creek RR - Part 5"
 Return to Waterscaping Part 4.
 Return to "Waterscaping, Part 3"
 Return to Christmas Train Day, 2018
 Return to "Adding a Train Shed Part 6"
 Return to "Adding a Train Shed Part 5"
 Return to "Adding a Train Shed Part 4"
 Return to "Adding a Train Shed Part 3"
 Return to "Waterscaping Part 2"
 Return to "Adding a Train Shed Part 2"
 Return to "Adding a Train Shed Part 1"
 Return to "Waterscaping the NEW New Boston and Donnels Creek Part 1,"
  Return to "Dirtscaping the NEW New Boston and Donnels Creek RR, Part 2.
 Return to "Adding Raised Roadbed to the NEW New Boston and Donnels Creek, Part 2"
 Return to "Adding Raised Roadbed to the NEW New Boston and Donnels Creek RR, Part 1"
 Return to "2018: Springing into Spring on the NEW New Boston & Donnels Creek RR."
 Return to "Dirtscaping the NEW New Boston and Donnels Creek RR, Part 1.
 Return to "Decking the NEW New Boston and Donnels Creek RR
 Return to "Framing the NEW New Boston and Donnels Creek RR, Part 6"
 Return to "Framing the NEW New Boston and Donnels Creek RR, Part 5"
 Return to "Framing the NEW New Boston and Donnels Creek RR, Part 4"
 Return to "Framing the NEW New Boston and Donnels Creek RR, Part 3"
 Return to "Framing the NEW New Boston and Donnels Creek RR, Part 2"
 Return to "Framing the NEW New Boston and Donnels Creek RR, Part 1"
 Return to "Breaking Ground on the NEW New Boston and Donnels Creek"
 Return to "Planning the NEW New Boston and Donnels Creek, Part 4"
 Return to "Planning the NEW New Boston and Donnels Creek, Part 3"
 Return to "Planning the NEW New Boston and Donnels Creek, Part 2"
 Return to "Planning the NEW New Boston and Donnels Creek, Part 1"
 Return to the New Boston and Donnels Creek RR Page
 Return to Family Garden Trains' Home Page
Note: Family Garden TrainsTM, Garden Train StoreTM, Big Christmas TrainsTM, BIG Indoor TrainsTM, and BIG Train StoreTM are trademarks of
Breakthrough Communications (btcomm.com). All information, data, text, and illustrations on this web site are
Copyright (c) 1999, 2000, 2001, 2002, 2003, 2004, 2005, 2006, 2007, 2008, 2009, 2010, 2011, 2012, 2013, 2014, 2015, 2016, 2017, 2018, 2019 by
Paul D. Race. Reuse or republication without prior written permission is specifically
forbidden.
Family Garden Trains is a participant in the Amazon Services LLC Associates Program,
an affiliate advertising program designed to provide a means for sites to earn advertising
fees by advertising and linking to amazon.com.
For more information, please contact us
 |  |
| Visit related pages and affiliated sites: | |||||
| - Trains and Hobbies - | |||||
|  |
|
 |
|  |
 |

|

|  |
|

|
| - Christmas Memories and Collectibles - | |||||
 |

|
 |

|

|
|
| - Family Activities and Crafts - | |||||
 |

|

|

|

|

|
| - Music - | |||||

|
 |
 |

|

|

|

|

|

|

|

|

|

|

|

|

|

|

|